InsurAce Protocol
  • Welcome to InsurAce.io
  • V2 Updates
  • About InsurAce.io
    • Overview
      • Why InsurAce.io
      • What is InsurAce.io
      • Use Cases
      • Architecture
    • Cover Products
      • Product List
      • Smart Contract Vulnerability Cover
      • Stablecoin De-Peg Cover
      • Ethereum Slashing Cover
      • Bridge Cover
        • LI.FI Bridge Cover
      • Custodian Risk Cover
      • Post-Audit Cover
      • Risk Transfer Cover
      • Bundled Cover [Not Avaliable]
    • Protocol
      • Pricing Models
      • Capital Management
      • Risk Assessment
        • Security Rating Methodology
      • Governance
        • Data Publications
      • Investment
      • Mining
        • Staking Mechanisms
        • Staking Risks
    • Tokenomics
      • Token Buyback
    • Security
    • Roadmap
    • Coverage Request
      • Apply to be Listed
    • Refer & Earn Program
      • Direct Sharing
      • Customize Referral Link
    • FAQs
    • Disclaimers
    • Contact Us
      • Twitter
  • Documentation
    • User Guide
      • Buy Cover Guides
        • General Guide
        • Ethereum Slashing Cover Guide
      • Claim Guides
        • General Guide
        • Ethereum Slashing Cover Guide
        • Evidence Checklist
      • Cancel cover
      • Launch DAPP & Connect Wallet
        • MetaMask Installation & Configuration
      • Claim Assessors
      • Advisory Board
      • Underwriting Mining (Stake & Unstake)
      • Liquidity Mining
        • UniSwap
      • Harvest Rewards
      • Token Bridge
        • Step 1: MetaMask installation & Configuration
        • Step 2: Bridge
        • Step 3: View Bridging Status
        • Step 4: Check Proof of Assets
      • Governance
        • Get veINSUR and veNFT
        • Unlock and Harvest
        • Submit Proposal
        • Cancel Proposal
        • Vote Proposal
        • Harvest Voting Rewards
        • Mining Pool Gauge
        • Cover Capacity Gauge
        • Committee Member Nomination
        • Committee Member Removal
    • Claim Records
    • Whitepaper
  • Developer Reference
    • Service Integration
      • APIs for service integration
      • Smart Contract ABI
      • UI integration
      • InsurAce.io APIs Docs
    • Smart Contract Addresses
  • PR & Marketing
    • Branding & Media Kit
  • External Links
    • Website
Powered by GitBook
On this page
  • Step 1: Install and set up MetaMask
  • Step 2: Add Customized Network

Was this helpful?

  1. Documentation
  2. User Guide
  3. Launch DAPP & Connect Wallet

MetaMask Installation & Configuration

Install and configure the MetaMask Wallet.

PreviousLaunch DAPP & Connect WalletNextClaim Assessors

Last updated 3 months ago

Was this helpful?

Step 1: Install and set up MetaMask

MetaMask can be downloaded on Chrome and Firefox, or on iOS and Android if you are a mobile user.

1. Head over to the MetaMask . From there, select whichever platform you’re using and follow the steps to install it on your device.

2. After installing the wallet, open the wallet on your browser and select Create a Wallet. Write down the backup seed phrase somewhere safe (preferably not on a device with Internet-connection). Without this seed phrase, your funds cannot be recovered if your device is damaged or lost. After that, confirm that you have written them down as prompted by Metamask.

3. You should now have your wallet and be able to send and receive funds.

Step 2: Add Customized Network

You might notice that you are using an Ethereum wallet. Let’s change that:

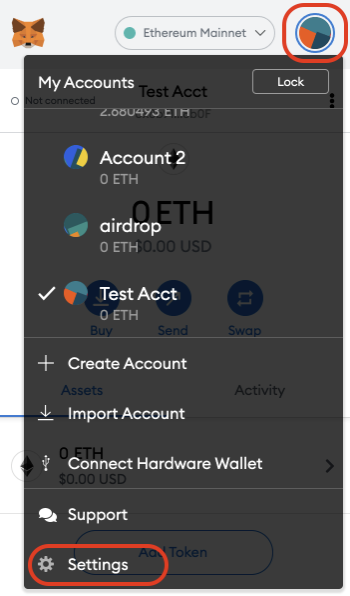
  • Open the wallet, click to expand the dropdown menu in the top-right corner.

  • Select Settings.

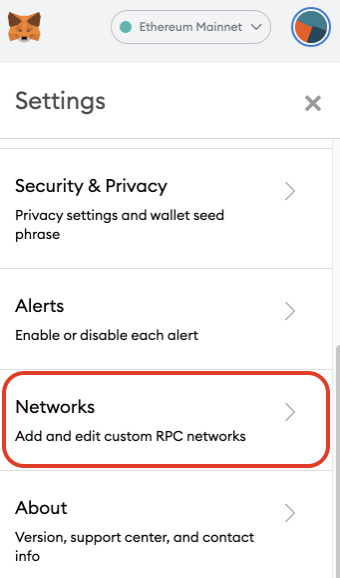
  • Scroll down and then select Networks.
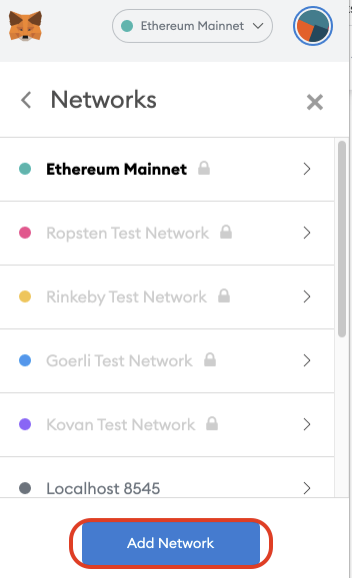
  • Click Add Networks.

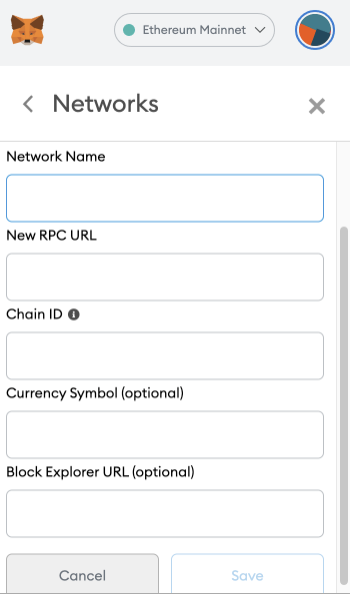
  • Enter network details. A list of network details is provided below.

Network

Details

Binance Smart Chain Mainnet

Network Name: Binance Smart Chain New RPC URL: https://bsc-dataseed.binance.org/ ChainID: 56 Symbol: BNB Block Explorer URL: https://bscscan.com

Binance Smart Chain (Testnet)

Network Name: Binance Smart Chain - Testnet New RPC URL: https://data-seed-prebsc-1-s1.binance.org:8545/ ChainID: 97 Symbol: BNB Block Explorer URL: https://testnet.bscscan.com

Polygon Mainnet

Network Name: Polygon Mainnet New RPC URL: https://rpc-mainnet.matic.network ChainID: 137 Symbol: MATIC Block Explorer URL: https://explorer.matic.network/

Polygon Testnet

Network Name: Mumbai TestNet New RPC URL: https://rpc-mumbai.maticvigil.com/ ChainID: 80001 Symbol: MATIC Block Explorer URL: https://mumbai-explorer.matic.today/

Avalanche

Network Name: Avalanche Network

New RPC URL: https://api.avax.network/ext/bc/C/rpc

ChainID: 43114

Symbol: AVAX

Explorer: https://cchain.explorer.avax.network/

  • Once you have saved the relevant network details in your wallet, you should be able to see that your wallet is set to the new network you have just recorded. You can now fund your wallet and explore accordingly.

download page